
Show different attribute options to different customers with Company Availability
Not every customer should see every option. With Company Availability, you can control which options inside a drop-down attribute each company sees — using the tags you've already set up — so customers only see what's actually meant for them.
In this article- What Company Availability does
- Before you start
- Set up visibility on an attribute
- Choose Include or Exclude (not both)
- Apply one option's rules to every option
- Search a long option list
- Override visibility for a single product
- What happens to default options
- What happens to existing orders
- How this works for B2B resellers
- When tags are renamed or deleted
- Things to keep in mind
What Company Availability does
Until now, every option inside a select-type attribute has been visible to everyone viewing a product in your catalog. That's a problem if you serve different kinds of customers — say a color line only specific dealers should order, or a finish reserved for certain accounts. The old workaround was to build duplicate attributes or duplicate products, which gets messy fast.
Company Availability lets you skip all that. You tag the options instead, and Allmoxy shows or hides each one per company based on the company's tags.
One important thing to know up front: this only applies to select-type (drop-down) attributes — the ones where customers pick from a list. It doesn't apply to text, numerical, or other attribute types, since there are no options to show or hide there.
Before you start
Your company tags should already be set up. Company Availability works off the same tags you use elsewhere, so if you haven't tagged your companies yet, do that first — that's what the whole feature keys off of.
Set up visibility on an attribute
Here's why this matters: this is where you decide, option by option, who gets to see what.
To get started:
- Open the select-type attribute you want to control.
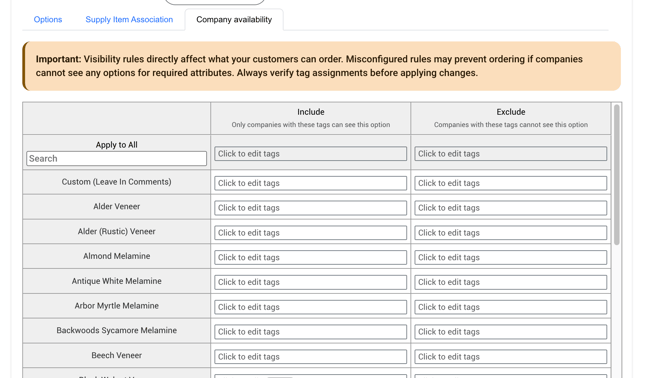
- Go to the new Company Availability tab in the attribute table (it sits alongside your existing tabs in the table of options).
- You'll see a simplified view — just your option names down the left, with Include and Exclude columns for each one. This view intentionally strips out the other attribute columns so you can focus on visibility.
You'll notice an alert near the top of the tab. Please pay attention to it in detail:
Important: Visibility rules directly affect what your customers can order. Misconfigured rules may prevent ordering if companies cannot see any options for a required attribute. Always verify tag assignments before applying changes.
 📸
📸
Choose Include or Exclude (not both)
For each option, you've got two ways to control visibility. P ick one per option, not both. Allmoxy enforces this: the moment you add a tag to one column, the other column locks for that option.
Include tags — only companies with a matching tag can see the option. Everyone else won't.
Helper text in Allmoxy: "Only companies with these tags can see this option."
Exclude tags — companies with a matching tag can't see the option. Everyone else still can.
Helper text in Allmoxy: "Companies with these tags cannot see this option."
A quick way to decide: if only a small, specific group should see an option, use Include. If almost everyone should see it except a certain group, use Exclude.
How matching works: it's "any," not "all." A company only needs one matching tag for the rule to apply — you don't have to match every tag in the list. So an Include list of Dealer and Premium means anyone tagged either Dealer or Premium will see the option.
And if you leave both columns blank? That option stays visible to everyone, exactly like it works today. Untouched options don't change behavior, so you only ever have to configure the ones you actually want to restrict.
Here's how it plays out with a real example:
- "Custom Color" option → Include tag Dealer. Only companies tagged Dealer see Custom Color. A regular retail customer won't even know it's there.
- "Budget Laminate" option → Exclude tag Premium. Everyone sees Budget Laminate except your Premium accounts.
- "Standard White" option → no tags. Everybody sees it.
Apply one option's rules to every option
If you want the same tag rule across the whole attribute — say every option should be Dealer-only — you don't have to set each one by hand. Set it once, then use Apply to All at the top left-hand side of the tab to push that option's configuration to every option in the attribute.
Because this overwrites the other options' settings, Allmoxy shows a confirmation dialog first. Give it a quick look before you confirm, especially if some options were already configured differently — Apply to All will replace those.
Search a long option list
If your attribute has a long list of options — think a big material or color list — scrolling to find one is a pain. Use the search field in the top-left of the table and start typing an option name. The list filters down live as you type, showing only the options that match. It's just there to help you find the right row quickly; it doesn't change any visibility rules.
Override visibility for a single product
Sometimes an attribute's tag rules are right almost everywhere, but one product needs to behave differently. You can handle that at the product level without touching the attribute-wide setup.
When you open edit overrides for an attribute on a specific product, you'll get the same Company Availability interface, with the same Include/Exclude rules. The key thing to understand: a product-level override completely replaces the attribute-level rules for that product — it doesn't add to them.
So at the product level you can add back an option the attribute normally hides, or hide one the attribute normally shows. Whatever you configure here is the full set of rules for that product; the attribute-level rules step aside entirely.
What happens to default options
This is the part worth slowing down on, because it's where a misconfiguration can quietly bite. Here's how Allmoxy keeps ordering functional when your rules hide something:
- If an attribute has a default option, but a company's tags hide that default — Allmoxy ignores the hidden default and automatically selects the first visible option for that company instead. The customer always lands on something valid.
- If no default is set on the attribute — nothing gets auto-selected. The customer sees the usual "-- select one --" placeholder and picks for themselves, just like today.
- Hidden attributes — a hidden attribute still needs a default set. Even if that default happens to be hidden by tags (which changes nothing visually, since the whole attribute is already hidden from the customer), Allmoxy still carries that default selection on the order behind the scenes. That's what keeps the order from breaking.
The practical takeaway: make sure every company can see at least one option for any required attribute. If your tags hide every option for a company, there's nothing for them to land on — and that's exactly the situation the warning alert is guarding against.
What happens to existing orders
When you change tag rules, you might hide an option that some existing orders have already selected. Allmoxy handles this using the same sticky-save logic you already know, and it depends on the order's status - i.e. bids are not sticky and will update with any changes automatically. Ordered status and beyond are a bit more sticky and only update with new option visibility if you make changes to a product on the order, forcing the product to recalculate.