
Production lines mirror what happens on your floor: a cabinet line and a door line, each with the steps an order goes through. Inside a line, categories group the labor processes your team clocks time against (cut, edgeband, paint, assemble, load). Once they exist, employees can clock onto a job, scanners can move orders through the shop, and reports show how long each step takes. A category can also move the order's status on its own when someone clocks a process in it. Separate lines also let you compare how each one performs in your reports.
Applies to: shops tracking jobs through production. Needs the Manage Processes permission. Lines live under Settings (gear) > Operations > Labor Processes.
In this article
- Create a production line
- Add categories and processes
- Assign products to a line
- Do something when a process starts or ends
- Things to know
Create a production line
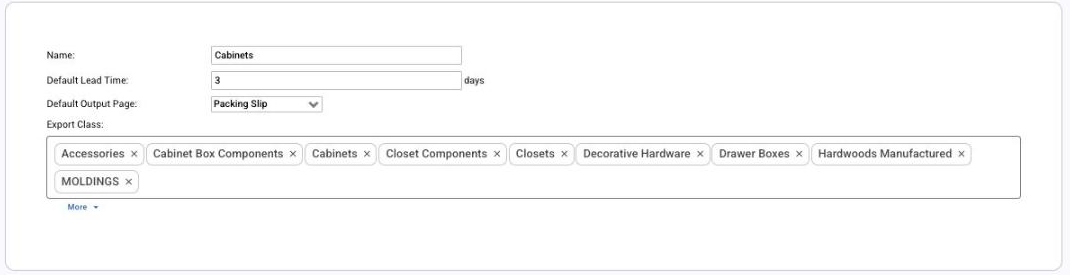
- Go to Settings (gear) > Operations > Labor Processes and click Add Production Line.
- Give it a Name, such as Cabinets or Hardwood Fronts.
- Set a Default Lead Time in days. The Production Timeline uses it to work back from the delivery date so every line finishes together.
- Pick a Default Output Page, the sheet this line's crew works from. Choosing one also makes that page visible to employees.
- Choose the Export Class or classes whose revenue belongs to this line. See Export classes.
- Click Save All Changes.
Add categories and processes
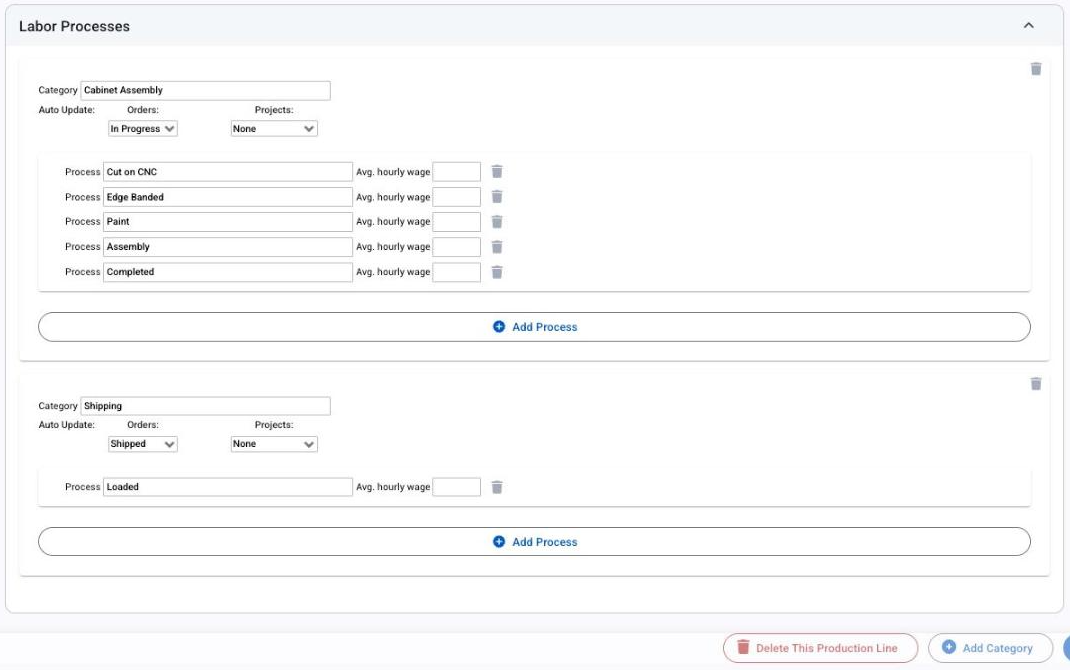
Open the line and scroll to Labor Processes.
- Click Add Category and name it, such as Cabinet Assembly or Shipping.
- Set Auto Update: the order status the category moves an order to when one of its processes is clocked. Cabinet Assembly might auto-update to In Progress; a Shipping category with a Loaded process might auto-update to Shipped. Leave it at None for steps that should not change the status.
- Click Add Process inside the category for each step: Cut on CNC, Edge Banded, Paint, Assembly, Completed.
- Give each process an Avg. hourly wage if you quote labor on itemized or project orders; it is the rate a labor line uses when no employee is named.
- Click Save All Changes.
A good first line has one process per thing you want to time. If you want to know how long machining takes, make Machining its own process. A door line, for example, might have Cut, Sand, Assemble, Finish and Wrap; employees can clock time to Sand and scan each order as they sand it, or simply mark Sand complete.
Assign products to a line
Open the product (Settings (gear) > E-commerce > Products) and choose its Production Line in Product Info. Products follow the category's line by default; tick Override to pick a different one for this product. The Product Updater has a Production Line column for setting many at once.
Assigning products is what lets the scanning station move one line's items separately, and what puts each line on the Production Timeline and the Work Schedule report. From the Work Schedule report you can start each production line within an order on its own.
Do something when a process starts or ends
Every clock-in and clock-out fires a trigger event, so you can email a customer when their job reaches finishing, or create a task when assembly ends.
- Go to Settings (gear) > Operations > Triggers and add a trigger.
- In Trigger when, choose Order Process Started or Order Process Ended and pick the process.
- Add the email, text or task you want.
Things to know
- Auto Update moves orders backward too. The status link has no forward-only guard. Clocking a process whose category links to In Progress on a Shipped order drops it back to In Progress; the Time Tracking dialog and the scanning station warn once and then go ahead. Keep status links on the categories that start and finish an order, and leave None on the rest.
- A line with products assigned cannot be deleted. Move the products first.
- The scanning station moves one production line at a time, and the whole order shows the lowest status of any line, so a finished door line never moves an order ahead of a cabinet line that is still in progress.
Watch: Create and organize your process (older screens)