
Custom fields let you collect unique information your shop needs — right on a company or an order — so it flows straight into your output pages and downstream tools instead of getting chased down later.
In this article
- What custom fields let you do
- Access Custom Fields
- Create a Custom Field
- Find Custom Fields
- Add Custom Fields to Output Pages
- Show fields on the customer sign-up page
- Make Custom Fields Required
What custom fields let you do
Every shop tracks something a little different — a PO number, a tracking number, Tax Exemption ID. Custom fields let you build those right into Allmoxy so the info lives where you need it and you're not collecting it over email.
You can create a custom field for a company, a contact, or an order, decide whether the customer can edit it, and then pull that field into your output pages as a variable. The whole point is to capture the right info once, in the right place, so it carries through the rest of your workflow automatically.
Access Custom Fields
Before you can build anything, your account needs permission to use the feature. If you head to Settings → Custom Fields and don't see it, that's totally normal — it just means the permission isn't switched on for your account yet. Your company's primary contact or CSM can do this for you! To get the user permission, edit the contact and navigate to User Permissions. Check Manage Custom Fields.
Once you have access, everything below happens under Settings ➡️ Custom Fields.
Create a Custom Field
This is where you decide what you're collecting and where it lives. From Settings ➡️ Custom Fields, create a new field and set:
- What it's for — a company, a contact, or an order.
- Whether the customer can edit it — leave Allow customer to edit on if they should be able to fill it in or change it; turn it off if it's for your team's eyes only.
Once it's saved, the field is ready to use — and it's automatically available as a variable for your output pages (more on that below).
Create your field and choose whether it lives on a company, contact, or order.
One handy combination worth knowing: you can show a field on the sign-up page for the customer to fill out, while leaving Allow customer to edit turned off. The result is that the customer fills the field in that one time during sign-up — but afterward they won't see or be able to change it in their settings. It's a nice way to capture something once at the start without leaving it open to edits down the road.
Find Custom Fields
Here's where each field shows up once it's created, so you know where to look:
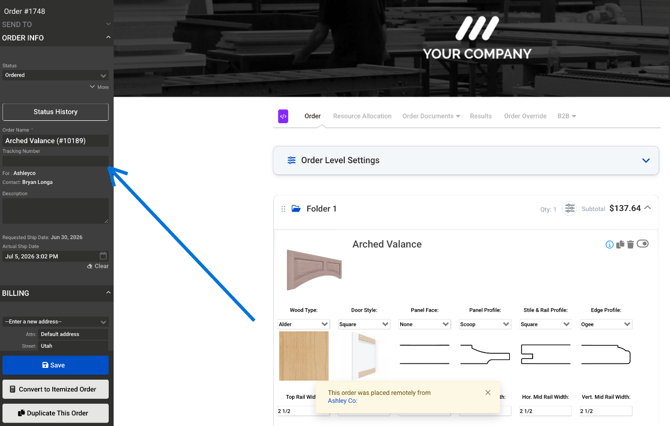
- Order fields appear in the sidebar of every new order, right underneath the Order Name.
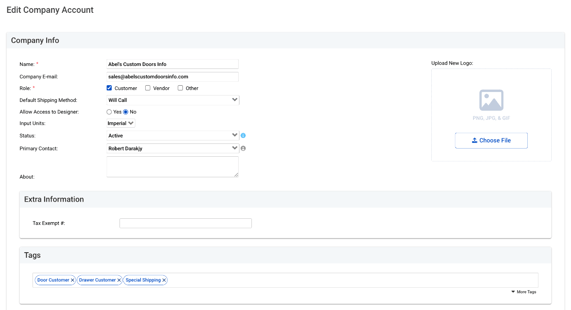
- Company fields appear in that company's settings, just above the Tags section.
Add custom field data to your output pages
The real payoff is getting this info onto the paperwork your team and shop floor actually use — work orders, packing slips, exports — without retyping it. Every custom field you create becomes a variable you can drop onto any output page.
To add one: go to Settings ➡️ E-Commerce ➡️ Output Pages, select the page you want to update, and you'll find your custom field's variable available to insert.
Show fields on the customer sign-up page
If there's info you want from a customer the moment they join — a tax ID, an account reference, etc— you can put a custom field right on your sign-up page. Look for the "Show during signup" setting on the field, which gives you three choices:
- No — the field doesn't appear during sign-up.
- Ask — the field appears and the customer can fill it in, but it's optional.
- Require — the field appears and the customer must fill it in before they can finish signing up.
Make Custom Fields Required
This one's worth setting up if a blank field ever creates work for you later. When a customer skips an order-level field, someone on your team usually ends up filling it in by hand — and if that field feeds a downstream tool, the whole export can stall on missing info.
To set it up, open the order custom field under Settings ➡️ Custom Fields and mark it as Required. From then on, that field has to be filled in on the Order page before the order can go through.
Remember the difference between the two "must fill this in" settings:
Require on Show during signup enforces the field during sign-up, while marking an order field as required enforces it on the Order page every time an order is placed.
Use whichever matches where you actually need the info.