
Export classes are how your revenue lands in the right place in your accounting software — and now they're a whole lot easier to keep clean. Instead of typing a class onto every product, you build your list once and pick from a dropdown everywhere.
In this article- What export classes do
- What's changed
- Create your export classes
- Set an export class on a product
- Set an export class on a proposal line item
- Tie an export class to a labor process
- See your export classes in reporting
What export classes do
Before we set anything up, here's why this matters: export classes are the label that tells your accounting software which income account or class a product's revenue maps to when it exports to QuickBooks or Xero. Get them consistent and your books reconcile cleanly. Let them sprawl — three slightly different spellings of the same class — and your exports get messy fast.
That's the whole reason for this change: keeping the list tidy so your revenue splits are accurate without anyone babysitting them.
What's changed
Here's the short version: export class used to be a text field you typed onto each product. Now it's a managed list you build once, then pick from a dropdown.
That's it — but it's a nice quality-of-life upgrade. No more "Cabinets" vs. "cabinets" vs. "Cabinet" showing up as three separate lines in your accounting export. You define each class once, and every product (and, soon, more) points at the same clean value.
If you already had export classes typed on your products, don't worry — this is simpler than it looks, and you're just formalizing what you already had into a reusable list.
Create your export classes
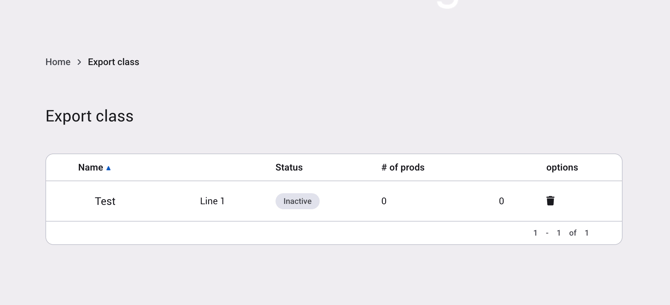
Everything starts on one page. Head to Catalog → Export Classes. This is your master list — the source for every export-class dropdown across Allmoxy.
To add one:
- Click Add export class.
- Give it a clear, consistent name — this is exactly what you'll see in the dropdown everywhere and what shows up in your accounting export, so name it the way you want it to read in your books.
- Save it.
Your list shows each class along with its status and how many products (and B2B products, B2B supply, and inventory items) are using it — so at a glance you can tell which classes are actually pulling weight and which are leftovers you can retire.
Set an export class on a product
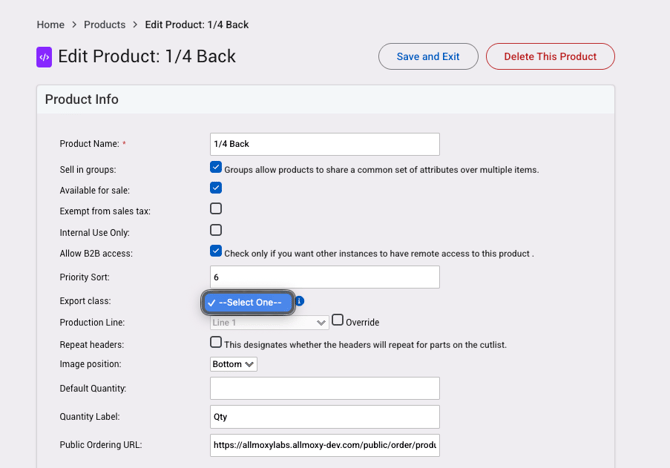
This is the placement you already know — it just works better now. On a product, the export class field is a dropdown instead of a text box. Open the product, find the Export class field, and pick the right one from your list.
Doing this in bulk? The Product Updater (Catalog → Products → Update) has an Export class column too, so you can set the class across a batch of products at once instead of one at a time.
Tie an export class to a labor process
Here's a genuinely new one: you can now assign an export class directly to a labor process, rather than relying on the product to carry it. That means the revenue from a process can map to its own class — handy when your labor and your materials shouldn't land in the same place in your books.
On the process, use the Export class dropdown to point it at the right class from your list.
Once your classes are set, they do their real work at export and reporting time. Your Sales by Export Class report groups revenue by class — the accounting-facing split that should match how income lands in your external books. The cleaner your list, the cleaner that report.