
Every change to a supply count that you want a record of goes through the Check-In / Check-Out form at the top of Supplies > Checkout/Order: check stock in, check it out (to an order or not), or move it between locations. Each entry adjusts on hand, updates the order's Allocated and Used if you tracked it to one, and writes a row on the Supply Movement report. Typing over the on hand number in the supply editor does none of that, so use the form for counts and corrections too.
Applies to: every shop that tracks supplies. The form and the Supply Check In toolbar button need the Check in/out inventory permission.
In this article
- Where the form is
- Fill in the form
- Check supplies in
- Check supplies out
- Move supplies between locations
- Do a physical count the traceable way
- Track every movement
- Things to know
Where the form is
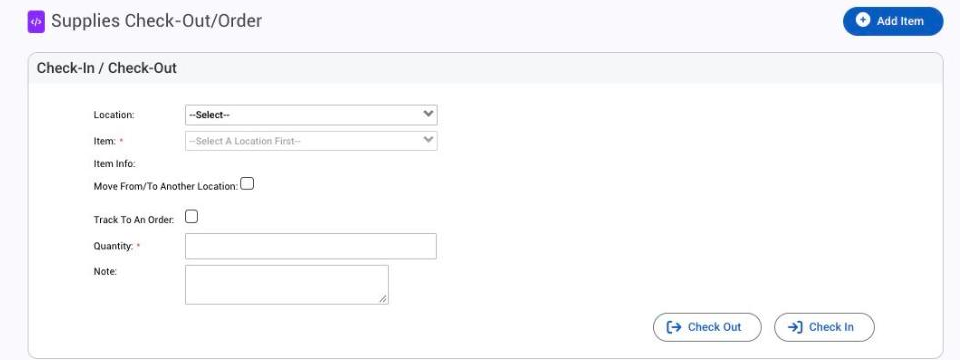
- Supplies > Checkout/Order: the Check-In / Check-Out form sits at the top of the page (titled Supplies Check-Out/Order), above the Need To Purchase list.
- The quick toolbar's Supply Check In button opens the same form from anywhere, so a person on the floor can log a check-out without leaving the order they're working on.
Fill in the form
- Pick the Location the stock is in (or, for a check-in, where it is going).
- Pick the Item; its Item Info shows underneath.
- To move stock, tick Move From/To Another Location and pick the To Location. Leave it unticked for a plain check-in or check-out.
- To tie the movement to a job, tick Track To An Order and pick the Order; its Order Info shows underneath. Leave it empty for stock that isn't for any order (shop use, a damaged piece, a delivery).
- Enter the Quantity, in the supply's piece size.
- Add a Note if the reason won't be obvious later (which count, which delivery, why it went back). The note shows on the Supply Movement report.
- Click Check In or Check Out. With the move box ticked, the quantity leaves the first location and lands in the To Location.
Check supplies in
Check In adds the quantity to on hand at the location. Use it for stock that arrives without a purchase order, for material that came back from a job, and for count corrections upward.
- Checked in with an order selected, the stock comes off that order's Used and goes back to Allocated: the order reserves it again. Lowering Used on the order's Resource Allocation tab does the same thing.
- Checking a delivery in by hand does not close the purchase order line. The item stays On Order and keeps reducing what Need to Purchase asks for. For a delivery against a PO, use Mark As Received on the On Order list instead: Receive, change or resend a purchase order.
Check supplies out
Check Out takes the quantity off on hand at the location.
- Checked out to an order, it raises that order's Used and lowers its Allocated by the same amount, so the reservation becomes a real withdrawal. This is the by-hand version of what Auto-Checkout Supplies does when an order enters In Progress; see How supplies are reserved and used on an order.
- Checked out with no order, it only lowers on hand: use it for shop supplies, samples, waste and count corrections downward.
- You can't check out more than the location holds. If the number is refused, count the shelf and check the difference in first.
Move supplies between locations
With Move From/To Another Location ticked, the form takes the quantity off the source location and adds it to the To Location in one step. You can't move more than the source holds. If the supply isn't stocked at the destination yet, the move creates that stock row for you, with no minimum and no group size, so set those on the supply afterwards if you want the new location to appear on Need to Purchase.
Do a physical count the traceable way
After counting a location, don't type the new totals into the supply editor or the Supply Updater. Both write the number straight to the stock row with no movement record, and an editor or updater form that was opened before someone else's check-out writes the old number back when it is saved.
Instead, for each supply that is off, check in the shortfall or check out the surplus with a note such as "Count 14 Oct". On hand ends up at the counted figure, and the Supply Movement report shows who adjusted what, when and why.
Track every movement
Every check-in, check-out and move is recorded. The Supply Movement report (Reports > Production) lists each one with the from and to locations, date, employee, supply, quantity and note, and filters by movement date, supply name, order number, location or supply tags. Use it to answer "who took the last box of slides" or to audit a count.
Two kinds of change never appear there: receiving a purchase order line (see the Received Supplies report under Reports > Managerial instead) and on hand typed into the supply editor or Supply Updater. The Inventory Usage report (Reports > Managerial) misses those two for the same reason.
Things to know
- Only the form and the order's tab leave a history. On hand typed in the supply editor or Supply Updater has no record and can be overwritten by a stale form; see Set up supplies, vendors and stock locations.
- A check-in does not close a PO line. Receive deliveries from the On Order list.
- Auto-Checkout Supplies can do the check-out for you when an order enters In Progress; when it is Disabled, someone checks each job out here or on the order's Resource Allocation tab.
- Something doesn't add up? See My supply counts or Need to Purchase look wrong.