
Set up inventory in three moves: create the locations where stock is kept (Settings > Operations > Supply Locations), add each supply with its piece size, vendors and stock levels (Supplies > Supplies), and, if you have many, import them from a CSV at Settings > Utilities > Import. The Supply Updater changes many existing supplies at once. For one or two new supplies the manual method is your best bet; start there to get comfortable with the fields, and the bulk import will make much more sense.
Applies to: every shop that tracks supplies. The locations page needs Manage Supply locations; the supply list, editor and Supply Updater need Manage Supplies; tags need Manage Tags; importing needs Import data.
In this article
- Create your stock locations
- Add a supply
- Add vendors and pick the preferred one
- Stock it at your locations
- Sell a supply as its own line
- Import supplies from a spreadsheet
- Change many supplies at once (Supply Updater)
- Things to know
Create your stock locations
A location is a place supplies are kept: a rack, a room, a trailer.
- Go to Settings > Operations > Supply Locations.
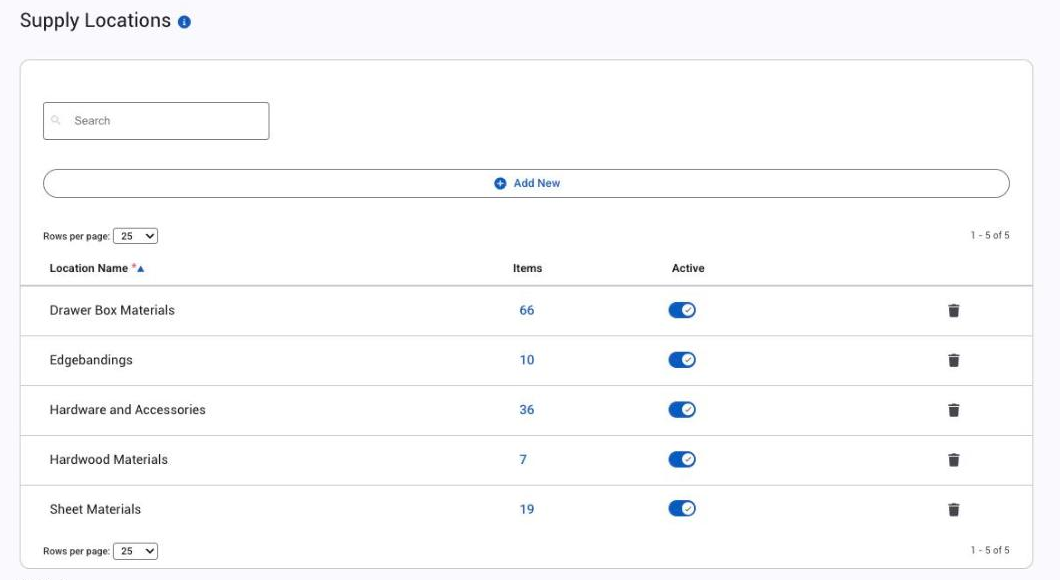
- Click Add New and name it. The Location Name is edited in place, and the Items count shows how many supplies each holds.
- Use the Active toggle to retire a location, or delete it (you're asked to confirm). A search box finds one by name.
Add a supply
- Go to Supplies > Supplies and click Add Item (or Add > Supply).
- Give the supply a clear, descriptive Name.
- Choose the Piece Size, the unit you count it in (board ft, pack, each, and so on). Prices, counts and part formulas all use it.
- Add a Part Number if you use internal part numbers for tracking, and a Description that will make sense to your team.
- Add Tags to group supplies; they're especially helpful for different sizes or variations of the same supply type (Tags).
- Fill in the vendors and locations below, then click Save (or Save and Edit Next to go straight to the next supply).
Add vendors and pick the preferred one
Vendors must be set up as companies with the Vendor role. The role belongs to the company, not its contacts, which inherit it; see Add customers: sign-up, add by hand, or import a list.
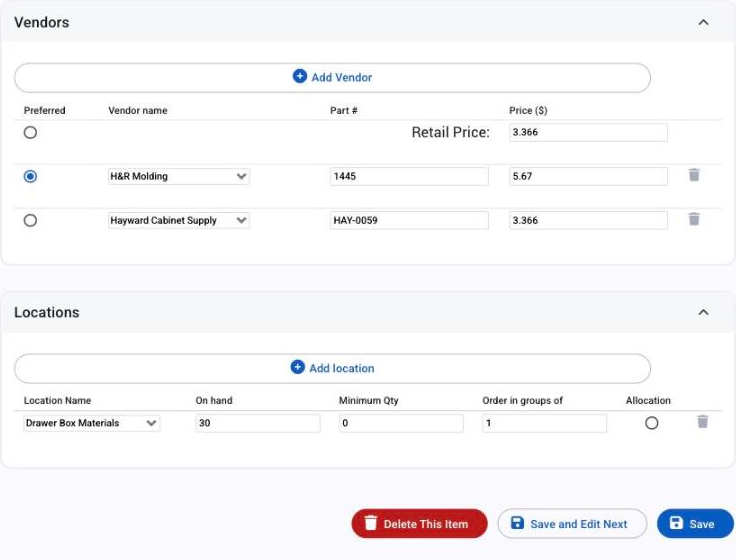
- In the supply's Vendors table, click Add Vendor and pick a vendor from the Vendor name dropdown. You can assign one vendor or several.
- Enter the vendor's Part # and their Price ($) for one piece size of the supply. The Retail Price row above the vendors is what the supply sells for on an order.
- Mark one vendor Preferred. Its price is the supply's cost everywhere in Allmoxy, and a purchase order for this supply goes to it by default.
Stock it at your locations
The Locations table says where this supply lives in your physical inventory. Click Add location to add a row for each location that holds it:
- On hand: how many you have there now.
- Minimum Qty: the level to stay above; Need to Purchase compares it with what is on hand, reserved and on order.
- Order in groups of: the pack size you buy in; Qty to Order is rounded up to whole groups. A row with no minimum and no group size never appears on Need to Purchase, so for items you only buy when an order needs them, set on hand 0, minimum 0 and Order in groups of 1.
- Allocation: the one location that a supply sold as its own order line reserves from; with none, a sold supply reserves nothing. Supplies used by product parts reserve from the location set on the part instead.
When Auto-Checkout Supplies (Settings > E-commerce > Order Settings) is Per Supply, the editor also shows an Auto Checkout box: tick it to check this supply out when an order enters In Progress.
Sell a supply as its own line
Tick Available in catalog to sell the supply on orders. More options appear: Sale Options (Allow B2B access, so B2B customers can buy it), Company Exclusive (one company or company tags), Parts Lists (which output pages display it) and Sale Info: sale name, priority sort for its place in your catalog, production line, export class (Export classes), weight in lbs (for shipping calculations), sale price, per-item price precision, and whether the customer can see it.
Import supplies from a spreadsheet
Adding several supplies, or hundreds? Importing saves time when you set up inventory or add products from a new supplier.
- Go to Settings > Utilities > Import and choose the type Supplies.
- Download the Supplies Import Template, a CSV with columns for vendor details, pricing and location data.
- Fill in one row per supply. Each row needs a location name (an unknown name creates a new location; an empty one skips the row) and pricing: the vendor name must match a vendor company exactly, a price with no matched vendor goes to Retail, and a row with neither is skipped. On hand, minimum and order quantities go to that location. A Sale Price makes the supply available for sale; any category named must already exist.
- Test with a single supply first, then a small group, before importing the whole file.
- Import and check the result. Every row creates a new supply, so importing the same rows twice makes duplicates: remove already-imported rows from the CSV before importing again. Undo last import works right after an import, for the login that ran it.
Column reference: Import data into Allmoxy.
Change many supplies at once (Supply Updater)
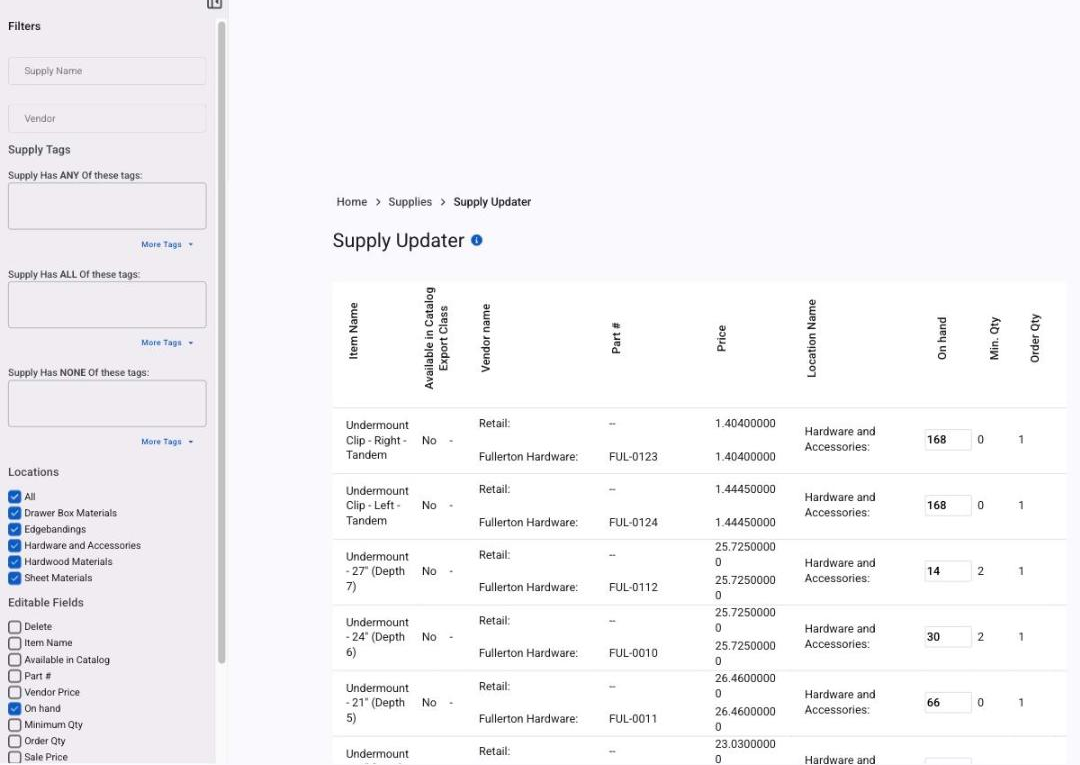
Supplies > Supply Updater modifies existing supplies across many items without recreating them: price changes, vendor updates, location modifications, counts, and deleting supplies.
- Set the filters (name, vendor, tags, locations), tick the Editable Fields you want to change, and click Get supplies.
- Edit the grid. Its columns are Item Name, Available in Catalog, Part #, Vendor Price, On hand, Minimum Qty, Order Qty, Sale Price, Production Line, Export Class, Tags and Delete. To delete supplies, tick Delete on each one.
- Click Save.
To copy a single supply instead, open it and use Clone this supply.
Things to know
- Typing over on hand leaves no history. The supply editor and the Supply Updater write the number straight to the stock row with no movement record, and a form opened before a check-out writes the old number back when saved. For counts and corrections, check stock in or out; see Check supplies in and out, move them, and count stock.
- Product prices don't follow supply costs by themselves; see Follow the cost of a supply.
- Supplies used by parts are set up on the product. See Link supplies to products.