-2.png?width=100&height=75&name=Allmoxy%20white%20(3)-2.png)
These settings allow admins to customize how ordering works and what functionalities are available when creating orders.
To access Order Settings, navigate to ⚙️ ➡️ Order Settings.
General Settings - Manual Entry Settings:
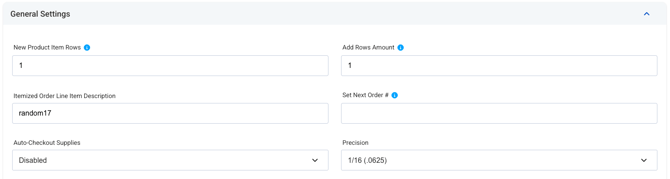
New Product Item Rows:
This setting controls how many empty line item rows automatically populate when a product is added to an order.
Think about the products you typically offer—most people aren't ordering 5+ of the same cabinet, but they might be ordering 10 of the same door style in various dimensions. Since this is a catalog-wide setting that applies to all products, consider what quantity makes sense for the majority of items you sell.

Add Rows Amount:
This determines how many new empty line item rows appear when you click +Add Row on a product. Like the setting above, this will vary based on your product offerings and typical order patterns.
Itemized Order Line Item Description:
This setting allows you to customize the name of the blank line item field on itemized orders.
Set Next Order:
Define the starting number for your orders. Order numbers are generated in consecutive order, but this setting allows you to determine a starting point for your order numbers.
Auto-Checkout Supplies:
⚠️This setting only applies if you have resource allocation set up. We highly recommend that resource allocation is only set up after launching the ordering system!
We typically recommend setting this to Per Supply when you first start allocating resources to orders. Once you've tested the system and understand how it works, you can change the setting to Global.
Precision:
Set a default measurement precision across your entire instance. This will round customer inputs to the nearest precision and by default, part calculations in the system will round to this precision (unless overridden at the part level).
General Settings - Toggle Selections:
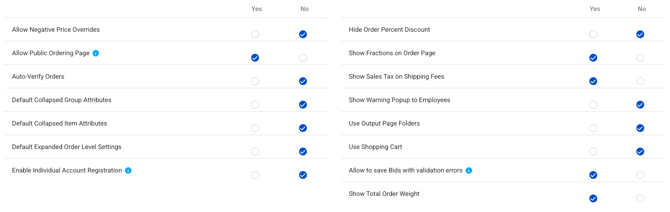
Allow Negative Price Overrides:
When enabled, employees can override a line item price with a negative number. This setting is restricted to employee-role accounts only.
Allow Public Ordering Page:
This setting allows site visitors to see and customize product selections without logging in. Users would still be required to create an account and sign in to submit an order or save a bid.
Auto-Verify Orders:
When enabled, this setting automatically converts orders to verified status upon order submission (Bid ➡️ Verified), streamlining your workflow. This is helpful if your catalog requires little changes or customizations and you want to prevent the customer from making any changes once they submit the bid as an order.
Default Collapsed Group Attributes:
Enable this to hide group attribute settings when first loading a product, keeping the interface cleaner. Users can still expand these settings as needed. This is helpful if you prefer that customers use the same options (door style, finish material, etc) for an entire order, in which case you'd use Order Level Settings to dictate the group attributes across the entire order!
| Group attributes collapsed: | Group attributes visible: |

|

|
Default Collapsed Item Attributes:
Similar to the setting above, this hides line item attributes when first loading a product, reducing visual clutter while keeping the information accessible.
Default Expanded Order Level Settings:
When enabled, this automatically expands Order Level Settings so you can see the attributes instead of just the summary bar.
Enable Individual Account Registration:
This setting allows individuals to create accounts without having a "company" associated with them.
Set to No if you primarily work with contractors and designers rather than individual homeowners. Set to Yes if you want to allow homeowners or individual customers to create accounts and place orders directly.
Hide Order Percent Discount:
This will show to the customer on the order page if an order discount has been applied to the order by an employee. Select Yes if you'd prefer for your customer to not see this discount percentage on their order page.
The discounted amount will be reflected on any output pages even if the actual order discount field is hidden from customers on the order page.
Show Fractions on the Order Page:
This setting converts decimals to fractions on the order page once the page is saved. Select No if you'd prefer to have decimals maintain on the order page.
Show Sales Tax on Shipping Fees:
This setting will break out tax on shipping as a separate line item on the order page if shipping is taxable on the order.
Show Warning Popup to Employees:
These notifications will alert employees to a customer's overdue balance and exceeding build limit before an order is submitted by an employee.
Use Output Page Folders:
This setting groups output pages by type: invoice and parts list, to reduce clutter on the order. Instead, hover over the folder and you'll see a list of output pages of that specific type.
Use Shopping Cart:
This setting changes the shopping experience so that customers are required to +Add to Cart any products they've customized before viewing additional catalog products.
Save Bids with Validation Errors:
This settings allows bids to be saved with 🔴 validations as a draft, so that the customer can save their progress and return to it later.
🗒️ All validations must be resolved before progressing the order to Ordered status.
Show Total Order Weight:
Show weight on the order page so customers can view the total weight of the products on the order
Customer Order Settings:

Default New Account Type:
This sets the default account type on the account creation page: Business or Individual
Default Lead Time:
Sets the standard lead time for all orders. We recommend using your longest typical lead time
Allow Customers to Request Shipping Dates:
This setting gives customers the ability to request a specific ship date for their order. This is helpful if you work with contractors who are scheduling installs around other projects. As a note, if customers have this ability, we recommend that reviewing the ship date is a manual step in the order verification process.
Always Show Terms & Conditions When Submitting Order:
Use this setting if you have specific terms and conditions that you want to ensure the customer reviews!
Configure your terms and conditions in the WYSIWYG editor on the order settings page! We recommend including things like your standard lead time, rush charge disclosure, remake procedures, etc!