
You have three ways to get customers into Allmoxy: share your Create Account link so they sign up themselves, add a company and its people by hand, or import a list from your old system. We recommend the Create Account link: customers set their own username and password and handle a forgotten one themselves, so there's less friction on both sides. Importing suits syncing with an existing database, or using Allmoxy internally without giving customers a login. Every way creates three kinds of record: companies, company contacts (people, who must belong to an existing company) and individual accounts (people not associated with a company or business).
Applies to: every shop. Adding companies needs Add/edit companies; adding contacts and individual accounts needs Add new user / edit other users profiles; importing needs Import data.
In this article
- Let customers sign up
- Add a company by hand
- Add the people at the company
- Import a customer list
- Mix and match
- Things to know
Let customers sign up
- Log out of your site: when self sign-up is allowed, the login page shows a Create Account button. The address is your Allmoxy address followed by /public/create_account/; share that link.
- Know what they fill in: account type (Business or Personal), company or personal details, shipping and invoice preferences, your custom fields, phone numbers, addresses (a billing address is required), websites, then a username (6 or more characters, or an email address), a password, time zone, and your terms. Allmoxy checks that a business email can receive mail.
- Know what happens next. The customer gets a sign-up confirmation email, is signed in, and lands on a new order. A business sign-up creates a Customer company with one contact; a personal sign-up creates an individual account. The New Company Created and new contact triggers fire (a personal sign-up fires the individual-account event instead); see Review new sign-ups and keep fake accounts out.
If your customers are businesses, or you don't take orders from individuals, go to Settings > E-commerce > Order Settings and set Allow Personal Account Registration to No: the Personal choice disappears and everyone must enter a business name. Sign-up can also be turned off entirely; if you don't see a setting for it, ask support.
Add a company by hand
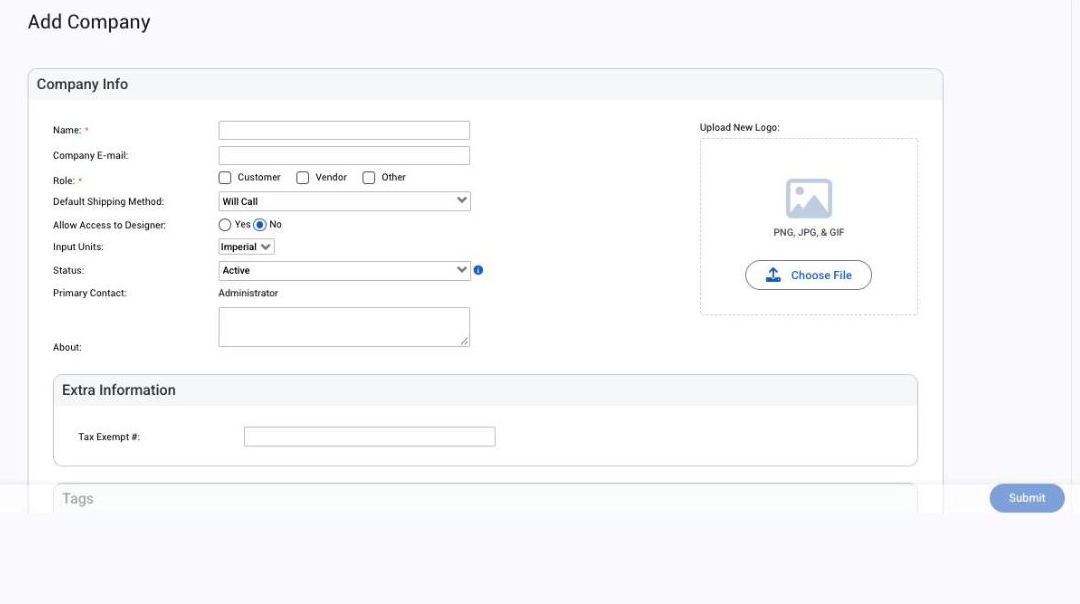
- Go to Add > Company.
- Fill in Company Info. Name and Role are required (marked with an asterisk); add the company email and a billing address too.
- Tick Customer under roles so the company can place orders. Roles show and save only for people with Change company roles; a company created without it has no roles, and its people have no permissions until someone ticks Customer.
- Add any company tags in the Tags section (needs Manage Tags; see Tags).
- Set unique payment terms, credit limit and order limit in Financial Settings. These save only for people with Manage Financial Settings; otherwise the company gets your shop defaults. See Payment terms overview and Credit limits and order limits.
- Add phone numbers, websites, addresses (including the billing address) and any custom fields under Extra Information.
- Click Submit. The company gets its roles' default permissions. To change them, open the company after you create it; see What your customers see and can do.
Add the people at the company
Right after you save a new company, Allmoxy opens Add Contact for it. For an existing company, go to Add > Company Contacts and pick it in Existing Company.
- Enter the person's name and email. The email must not belong to any other contact, inactive ones included; if you see "The email is already taken", see "The email is already taken".
- To let them sign in, tick Allow this person to log in in the User Account section, then enter a username (6 or more characters, unused) and a password, or use Generate password for a temporary one. These fields save only for people with Change username.
- Set the person's own permissions if they should differ from the company's (needs Modify permissions), then save.
The first contact at a company becomes its primary contact. Once a contact has both an email and a username, Allmoxy sends them a welcome email.
For a customer with no business behind them, use Add > Individual Accounts (titled Add Personal Account). It has its own Financial Settings, and the account never appears on the Companies list.
Import a customer list
Export the list from your old system; importing lets you clean it up and reformat it to match Allmoxy's import template first. Gather all of it into one spreadsheet and clean it: capitalization, proper addresses, odd abbreviations. Delete the customers you don't want to create an account for. Then split it into several imports by customer type (copy and paste, or save revisions).
- Go to Settings > Utilities > Import (needs Import data) and choose the type: Companies, Company Contacts or Individuals.
- Download the template (built live, so it includes your custom fields) and match your columns to it.
- Check the rules. Company rows need a name, a role of customer, vendor or other, and a first line on each address; a Primary Contact cell creates that contact from the first three words of the name. Contact rows need a first and last name and match the company by exact name or ID; a row whose username or email is already in use is skipped.
- For contacts and individuals, a box asks whether to send welcome emails.
- Import, check the result and fix skipped rows. Don't re-import the whole file: the importer never updates existing records or checks companies for duplicates, so you'd get every company twice.
Undo last import works once, for the login that ran it, and is incomplete: addresses, phones, tags and primary contacts from a company import can stay behind. Avoid it after a companies import if you use company custom fields. Column reference: Import data into Allmoxy.
Mix and match
Importing versus sign-up isn't an either-or decision. Split it by customer type: import the dealers you already have everything on, let new customers use the Create Account link, and keep sign-in off for the ones you track internally. Use some customers as a beta group for early feedback; see Customer sign-ups for their side of it.
Things to know
- Email and username must be unique, and the check includes inactive contacts and individual accounts.
- The welcome email needs both an email and a username, so people who will never sign in get none. See Emails Allmoxy sends.