
Zapier connects Allmoxy to the other apps you use, automatically: a new company in Allmoxy becomes a subscriber in your email marketing tool, an order status change becomes a row in a spreadsheet or a message in a chat channel. Whether you want to run additional metrics, send mail merges or get additional product data out of Allmoxy, a Zap can carry it. This article gets you connected: turn the module on, get your Zapier API key at Settings > Integrations > Zapier, add the Allmoxy app in Zapier, then build and test a two-step Zap that sends new companies to Mailchimp.
Applies to: every Allmoxy site with the Zapier module turned on. Seeing the key needs the View Zapier key permission and generating one needs Manage Zapier key. You also need a Zapier account at zapier.com.
In this article
- Before you start
- Get your Zapier API key
- Add the Allmoxy app to Zapier
- Build a two-step Zap: new companies to Mailchimp
- Test the Zap
- If you regenerate the key
- Zapier or an Allmoxy trigger?
- Things to know
Before you start
Zapier is a module Allmoxy turns on for your site; ask your Customer Success Manager or support@allmoxy.com to turn it on. Until it is on, the Zapier page does not appear under Settings and nothing is sent to Zapier.
You need the right permission: View Zapier key to see and copy the key, Manage Zapier key to generate one. If you can't find the page at Settings > Integrations > Zapier, that is the first thing to check.
One word about words. In Zapier, a "trigger" is the event that starts a Zap. In Allmoxy, a trigger is a rule you build at Settings > Operations > Triggers. They are separate systems, and this article says "Zap trigger" when it means Zapier's. If all you need is a one-time list of your customers rather than a live feed, export them instead.
Get your Zapier API key
- Go to Settings > Integrations > Zapier.
- If no key exists yet, click Generate New Zapier API Key.
- Use the eye icon to reveal the key and the copy icon to copy it. Keep it somewhere safe; it identifies your site to Zapier.
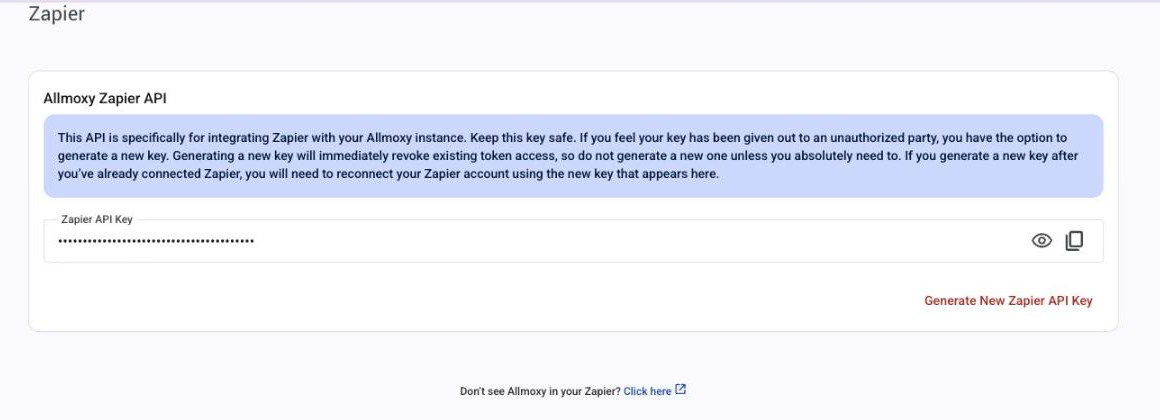
This is the Zapier API key, and it is not the access key from the API pages (Generate and edit access keys); the two are different keys for different doors. If a key already exists and Zaps are using it, don't generate a new one just to see it (see "If you regenerate the key" below).
Add the Allmoxy app to Zapier
The Allmoxy app is added to your Zapier account through an invite. Use this link to add Allmoxy to your list of apps to choose from: Allmoxy App in Zapier. Sign in to Zapier if it asks you to, and accept the invite. The same link is at the bottom of the Zapier page in Allmoxy ("Don't see Allmoxy in your Zapier? Click here").
From then on Allmoxy shows up when you search for an app in the Zap editor, and the first time you pick it Zapier asks you to connect your account by pasting the Zapier API key.
Build a two-step Zap: new companies to Mailchimp
Here we'll create a Zap that sends company information to a marketing system (Mailchimp, in this example) each time a new company is created in your Allmoxy site.
- In your Zapier account, click "create new Zap".
- Start at the top of your Zap with the first step. Find and choose Allmoxy as the first app to connect, and follow the instructions to connect your account. It will ask for your API key, which you'll find in your Allmoxy account under Settings > Integrations > Zapier (previous section).
- Choose what event will trigger this Zap to fire. Here we want it to fire when a new company is created, so pick New Company Created.
- Hit continue. Zapier gives you the option to test this trigger part of the Zap (next section); it is not a bad idea, but it is not required.
- In the second step, choose what happens when a new company is added in Allmoxy. Here we'll choose Mailchimp and its add a new subscriber action. Zapier will ask you to sign in to your Mailchimp account, then you map Allmoxy's fields (company name, email, phone numbers, address pieces) onto Mailchimp's subscriber fields.
- Test the step to make sure it works, then click "Done Editing" and turn the Zap on. Your Zap is complete.
One thing to know for this example: New Company Created fires when a company is added by your staff on the Add Company form or through the API. A company that signs itself up on your public sign-up page sends New Signup: Business Account instead. To catch both, build a second Zap on New Signup: Business Account with the same Mailchimp step. Every Zap trigger and the fields it sends are listed in Zapier triggers and the data each one sends.
Test the Zap
When Zapier offers to test the trigger step, it directs you to create a new company in your Allmoxy site, then click the "test trigger" button in Zapier to see whether that action was captured. Create a test company (you can delete it afterwards), go back to Zapier and test. Zapier pulls its sample from the last 10 events of that kind sent from your site, so if you created a company a few minutes ago it is already there to pick.
Then test the second step the same way: Zapier runs the Mailchimp action with the sample company and shows you the result, so you can check that the right fields landed in the right places before anything real goes through.
If you regenerate the key
Generate New Zapier API Key replaces the old key, and the page asks you to confirm before it does. The moment the old key is gone, every Zap connected with it stops receiving data. So regenerate only when you mean to (a key has leaked, or a person who had it has left), and straight afterwards reconnect the Allmoxy account in Zapier with the new key, then check each Zap that uses Allmoxy.
Turning a Zap off also stops the data: Allmoxy stops sending to it, and turning the Zap back on subscribes it again. If a Zap went quiet, check that it is on and that the Zapier module is still on for your site.
Zapier or an Allmoxy trigger?
Zapier and Allmoxy triggers are separate systems with different event lists. Zapier gets a fixed set of moments (new companies, contacts and sign-ups, order status changes, invoices, payments recorded by hand, tags added or removed, process starts and ends, and employee clock events) and sends a summary of each record. A trigger listens for any of the events in Trigger events, conditions and message variables: reference, can be narrowed to one company, company tags or certain products, and can email, text, tag or send the full record to a web address.
Use Zapier when the other app is in Zapier and the moment you need is one Zapier gets. Use a trigger with the Send web request (Webhook) action when the event is not in Zapier's list (a note, an attachment, a signed output page, a ship date change, a card or bank payment), when you want the full order with its items and custom fields, or when you have your own address to send to. The two work together: a webhook can post into a Zapier catch hook address, so even those events can end up in a Zap. See Send order data to another app with a webhook.
Things to know
- The Zapier key is not the API access key. Zapier wants the key from Settings > Integrations > Zapier; the API pages have their own keys and they are not interchangeable.
- Regenerating the key cuts off every Zap using the old one. Reconnect Allmoxy in Zapier with the new key before you expect data again.
- Zapier's payment events only cover payments you record by hand. Card, bank and account-credit payments never reach Zapier. For every payment, build a trigger on Payment Made with an email or webhook action.
- A company that signs itself up sends New Signup: Business Account, not New Company Created. Build a Zap on each if you want both.
- This is a very basic introduction to building a two-step Zap. If you get stuck inside Zapier, Zapier's own support is at https://zapier.com/help, and support@allmoxy.com can help with the Allmoxy side.