
A good output page shows each person exactly what they need and nothing else. Formatting lives in three places: the page (layout, variables, orientation), each attribute (which pages it prints on, how wide its column is) and each part (which pages, which part attributes, how they sort). Find what you want to change on the printed page first, then go to the place that controls it.
Applies to: anyone tidying up invoices, part lists or cut sheets. Needs the Manage Catalog permission.
In this article
- Use variables in the layout
- Hide an attribute that doesn't apply to a product
- Hide attributes or parts that are zero or empty
- Split parts across dedicated pages
- Hide a whole part or one part attribute
- Column widths and spacing
- A page is too wide for the paper
- Sort parts on a cut sheet
- Repeat column headers
- Add a logo or image
- Print landscape
- A number shows the wrong decimals
Use variables in the layout
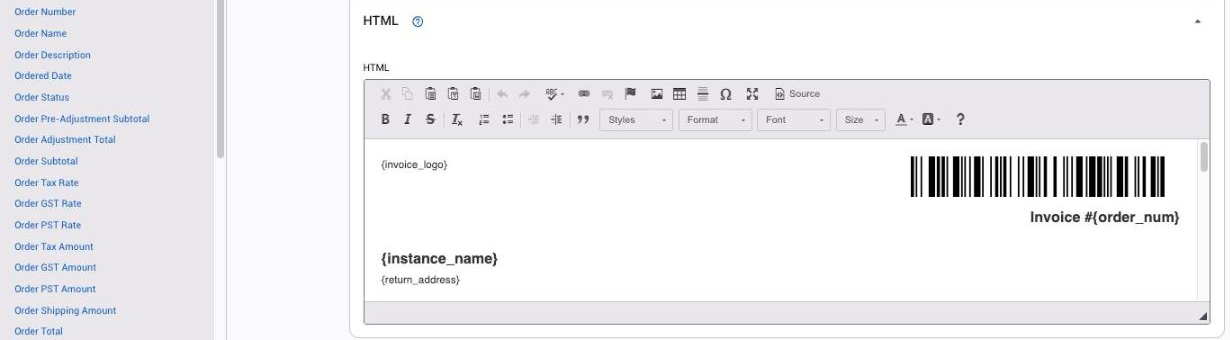
Open the page (Settings > E-commerce > Output Pages) and scroll to the HTML editor. Click where you want the value, then click a name in the black sidebar; it is inserted as {ship_date}, {order_num} and so on. Most names are self-explanatory. A few that get asked about:
- Order Description is the Description field in the order's sidebar.
- Order Pre-Adjustment Subtotal is the price before any price adjustment (usually a discount); Order Adjustment Total is the dollar amount of that adjustment.
- Order Tax Rate is the percentage charged; Order Tax Amount is the dollars.
- Products is where the product list goes. Everything above it is the header and everything below it is the footer of each printed page.
Variables can be strung together. A link straight to the order looks like www.{instance_name}.allmoxy.com/orders/quote/{order_num}.
Tip: keep a second browser tab open on an order's output page. Save a change in the editor, refresh the order tab, and see the result.
Hide an attribute that doesn't apply to a product
A common headache is an attribute that prints where it is not relevant, such as Mitered Style on a drawer-front cut sheet. Two fixes, which work together:
Option 1: Hide if Selected on the option. Every select attribute's option table has a Hide if Selected column. Set it to Yes on an option and the attribute disappears from every output page whenever that option is chosen. Set it on the default (often None) so the attribute only prints when something unusual was picked. For example, set Hide if Selected on None for Outside Edge Profile and the profile only prints when one was chosen. Some shops do this for their standard material: if Almond Melamine is hidden, the floor knows no material shown means Almond.
Option 2: Edit Overrides on the product. If the attribute does not belong on one product at all (hinge drilling has no place on a drawer front, for example), open the product (Settings > E-commerce > Products), find the attribute and click Edit Overrides to set its default to None for that product only. Option 1 must also be set on the None option, or the override alone changes nothing on the page.
Hide attributes or parts that are zero or empty
Open the output page and tick Hide attributes that are zero or empty. Any attribute with no value or a value of 0 is left off that page.
This works for parts too, provided the part's quantity formula returns 0 when the part is not needed. A formula that returns a blank is not caught.
Split parts across dedicated pages
One All Parts page is fine for simple orders, but on the shop floor each station only needs its own pieces. Most shops end up with:
- a Quote or Confirmation page (Invoice type, customer-facing, products and prices);
- an Invoice page (final pricing and totals);
- an All Parts page (internal, every part);
- cut sheets by part type, such as a Panels page and a Stiles and Rails page, or separate Doors and Moldings pages.
Each part can show on one page, several or none. Open the product, Parts tab, open the part, and tick the pages. To build a sheet for one role, say finished door sizes and punch info for final sizing, create a new Part List page and tick only those parts. Less on the page means less to miss.
Attributes can be narrowed the same way: open the attribute and tick only the pages it belongs on, so a cab mark number shows on the quote and not on every cut sheet. Nothing assigned to a page cannot print there.
Hide a whole part or one part attribute
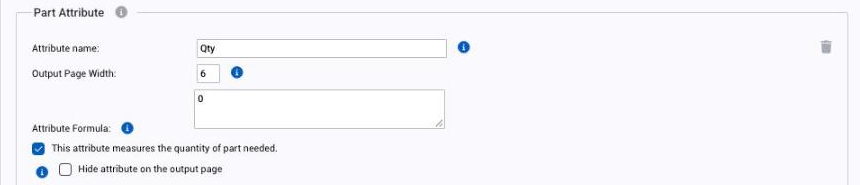
Open the product's Parts tab and open the part. Untick Show on for the page to remove the whole part (its quantity, width and length together). To keep the part but drop one value, tick Hide attribute on the output page on that part attribute.
Column widths and spacing
The parts table on a Part List page always has the same shape: the product on the left, its parts stacked beside it. What you can change is each column's width, which is measured in characters.
- Attribute columns: open the attribute and set Output Page Width.
- Part attribute columns: open the product, Parts tab, open the part, and set Output Page Width on each part attribute.
A good rule of thumb is one or two characters more than the heading, so a column headed "Width" gets 7. Narrower columns let three parts fit on a line instead of two (Base Back, Base Left Side and Base Right Side side by side, for example), which shortens a long list. If a page is still crowded, move a group of parts (drawer boxes, say) to its own page as described above.
A page is too wide for the paper
If a page runs off the edge of the paper or the PDF, or each product takes too many lines:
- Narrow the columns. Lower Output Page Width on the attributes and part attributes that print (see Column widths and spacing). Wide text fields, such as comments, are the usual culprit.
- Pick a smaller Product Font Size on the output page (8px to 16px). It sets the size of the product and supply information, which the editor's own text sizes don't reach.
- Tick Condense for print under PDF Options for tighter spacing.
- Turn the page landscape for more room (see Print landscape).
- Move a group of parts to its own page (see Split parts across dedicated pages).
Sort parts on a cut sheet

By default parts print in the order they were added to the order. To cut large pieces first, set the sort on the product: open the product (Settings > E-commerce > Products) and find Output Page Part Sorting, with Primary, Secondary and Tertiary Sorting dropdowns that list the product's attributes and part attributes, for example Width, then Height. Sorting runs largest first (descending), so sorting by Width puts the biggest pieces at the top of the cut sheet. Sorting is per product, so set it on every product that shares a cut sheet.
On screen you can also click a column heading on the output page to sort that table; each click flips between ascending and descending. Once the first column sorts the way you want, click a second heading for a secondary sort (all the 15" panels, then by length). This sorts the view you are looking at, not the saved layout.
Repeat column headers
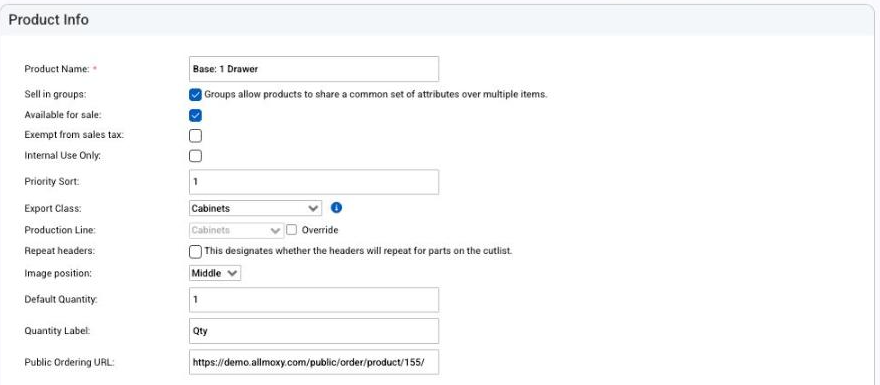
To print the column headings above every part instead of once per product, open the product and tick Repeat headers near the top of its settings. Untick it to stop.
Add a logo or image
In the page's HTML editor click the image button, upload the file and click Send it to the Server. Set the size and spacing, click OK, and the image is placed where your cursor was. Double-click the image later to reopen the dialog. The {invoice_logo} variable prints the logo from your site settings without any upload.
Product pictures. To print each product's picture, tick Show product images on this output page. Show group attribute images on this output page adds the pictures of the options chosen. These print at the left of each product's entry, and that spot can't be moved. To put an image anywhere else on the page, such as beside the header, place it in the layout with the image button as above. The product's Image position setting moves pictures on the order form, not on output pages.
Print landscape
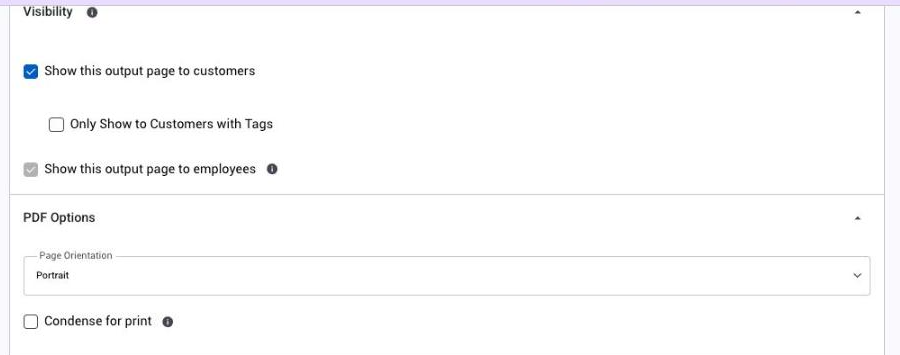
Open the output page, scroll to PDF Options and set Page Orientation to Landscape. Condense for print on the same section tightens spacing for a shorter printout. Print All needs every included page to use the same orientation.
A landscape PDF can wrap like portrait. In a landscape PDF, a product's attributes can wrap onto a new row where they would on a portrait page, leaving space on the right. To fit more on a row, narrow the columns, pick a smaller Product Font Size, or tick Condense for print. Making landscape PDFs use the full width is on our request list.
A number shows the wrong decimals
If a part's price or size prints with too many or too few decimals, open the part on the product's Parts tab and change its Precision (whole number, 1/16, 1/32, .01 and so on). The same setting exists on each attribute under Edit Overrides on the product.
Watch: Sorting a cut sheet by one column, then another