
Notes keep what you know about a customer or an order on the record itself. Tasks hand a piece of work to a person, with a due date and, if you want, a repeat. Announcements send one message to a group, from one company to every customer. All three are created from the Add menu or from the record they're about, and this article covers where each one shows up, who can see it, and how to change or remove it.
Applies to: every shop. Notes marked Anyone need Allow Public Notes; assigning tasks needs Add/recieve tasks (for both the assigner and the assignee); announcements need Create Announcements; the Tasks report needs View Task Report.
In this article
Notes
Notes can be added to orders (from the order sidebar), to companies, contacts and individual accounts, and to products and supplies, for any extra information you want to keep with the record. Customers don't see your notes about them.
- Go to Add > Note, or open the record and use its Add Note button. On the Companies list you can also hover over a company or contact name and pick Add Note from the menu that appears.
- Write the note and set About (the record it belongs to) if it isn't already filled in. When defaults to now; change it to back-date a note.
- Pick the visibility: Private, My Company (people at your company) or Anyone. Anyone appears only for people with Allow Public Notes.
- Save.
The View/modify private data permission has no effect on notes; visibility is set by the choice on the note itself.
Tasks
Use tasks to tighten your workflow. They're especially useful for employees whose daily work depends on something else happening first, because a trigger can create a task: for example, a new order is placed and you want your office staff to verify it before it goes to the shop floor, so a triggered task pops up for that employee as soon as the order is placed. A trigger's task is attached to the record's company and is due at the trigger's time today (tomorrow if that time has passed). See Intro to triggers.
You can also create manual, one-off tasks for yourself or another employee, and recurring tasks for work that repeats, like a monthly reconciliation.
- Go to Add > Task, click the Task button on the quick toolbar, or use Add a Task on a company, contact or individual account page.
- Write the task and pick who it's for in Assign to. Only people with Add/recieve tasks are offered. Use Copy To for more people; each person gets their own copy of the task.
- Set About (the record it's for), tick Private if only the people on it should see it, and set the Due date and an optional time.
- For a recurring task, set Repeats: Never, Daily, These days, Weekly, Biweekly, Monthly, These months or Annually, and an Until date if it should stop.
- Save. The assignees are told by email, text or an in-app announcement per their notification settings. If a notification can't be sent, the task is still saved.
Tasks show up on the side panel of your home page (the time card page), not at the top of your pages like announcements do: My Tasks is what's assigned to you, and Tasks Assigned By Me is what you've handed out. A company, contact or individual page shows the tasks about that record in its sidebar. From there you can mark a task complete, snooze one instance to a later date, or edit and delete the tasks you assigned and the tasks assigned to you. The assignee is the person who marks a task complete; the person who assigned it can edit or delete it; and administrators (Administer the entire site) can complete or delete any task. To cancel a recurring task, the person who created it opens Tasks Assigned By Me and deletes it, or an administrator deletes it.
The Tasks report at Reports > Managerial > Tasks shows every task in the system with its assignee, what it's about, due date, completed date and the task text, and filters by due date, record, assignee and completed or not. Employees must have View Task Report to open it.
Announcements
Announcements send a message to large groups of people, up to every customer at once.
- Go to Add > Announcement.
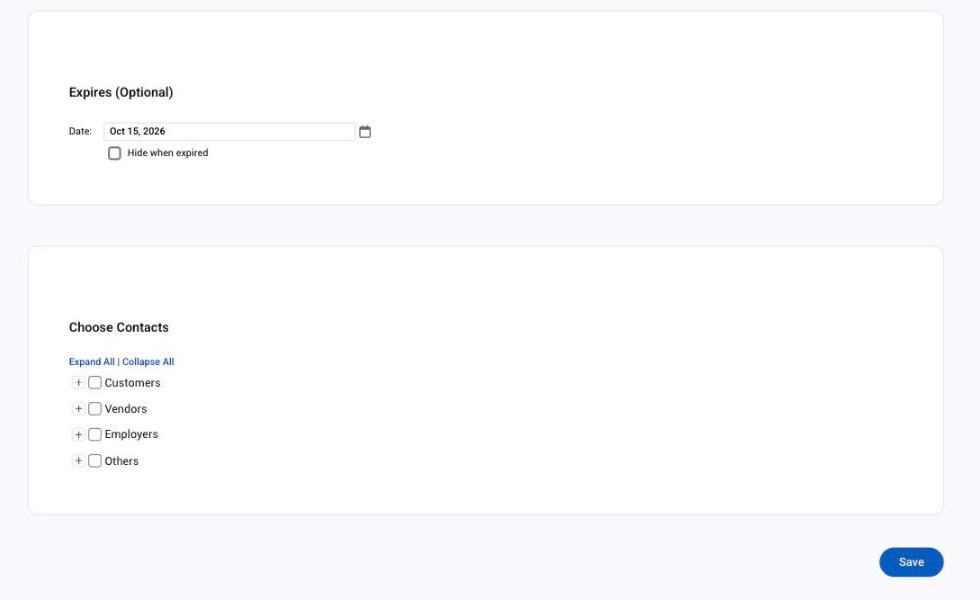
- Write the message. In Choose Contacts, tick a whole role (Customers, Vendors, Employers, Others), or open it and pick by letter, company and contact.
- Set an expiry date if the message has a shelf life, and tick Hide when expired so it disappears on its own.
- Click Save. The announcement lands on each person's dashboard the next time they sign in and is emailed or texted to them per their notification settings. People check the bell icon to view existing announcements; a red badge appears, and the bell shakes, when a new one is waiting.
To edit or delete an announcement you published, go to Reports > Managerial > Announcements and hover over its row for Edit or Delete. Editing changes the message and expiry only, not who gets it, and it marks the announcement unread and notifies everyone again. Creating needs Create Announcements; the report shows for people with Create Announcements or Manage Announcements.
Things to know
- Three places to create all of them: Add > Note, Add > Task or Add > Announcement in the main menu; the Add Note or Add a Task button on a company, contact, individual account or order; and, for tasks, the Task button on the quick toolbar.
- Edit an announcement and everyone hears about it again. Fix typos before you publish, or delete and post a new one if the audience changed.
- Several assignees means several tasks. Each person on Assign to or Copy To gets their own copy, and each completes their own.
- Who gets the emails and texts is set per person; see Emails Allmoxy sends and who gets them. To reach every customer by email outside Allmoxy, see Export your customer list and email your customers.