
Start a catalog order from Add > Order or Orders > Add Order, fill in who it's for and when it ships in the order's sidebar, add products, then save it as a bid or submit it. Folders keep a big job organized, and attachments keep drawings and photos with the order.
Applies to: catalog orders, for your team and for customers who log in to order. Itemized and project orders start from their own menu items (see itemized orders and project orders).
In this article
- Start the order
- Fill in the order info
- Add products
- Group products into folders
- Attach files
- Give the order a discount
- Save or submit
- Check that it worked
- Things to know
Start the order
Click Add > Order, or go to Orders > Add Order. Some accounts show Add Catalog Order instead.
The other order types have their own entries:
- Add > Itemized Order or Orders > Add Itemized Order. See Itemized orders: price a job from your costs and your catalog.
- Add > Project Order or Orders > Add Project Order. See Start a project order and build the proposal.
Fill in the order info
The Order Info section of the sidebar says who the order is for and when it ships.
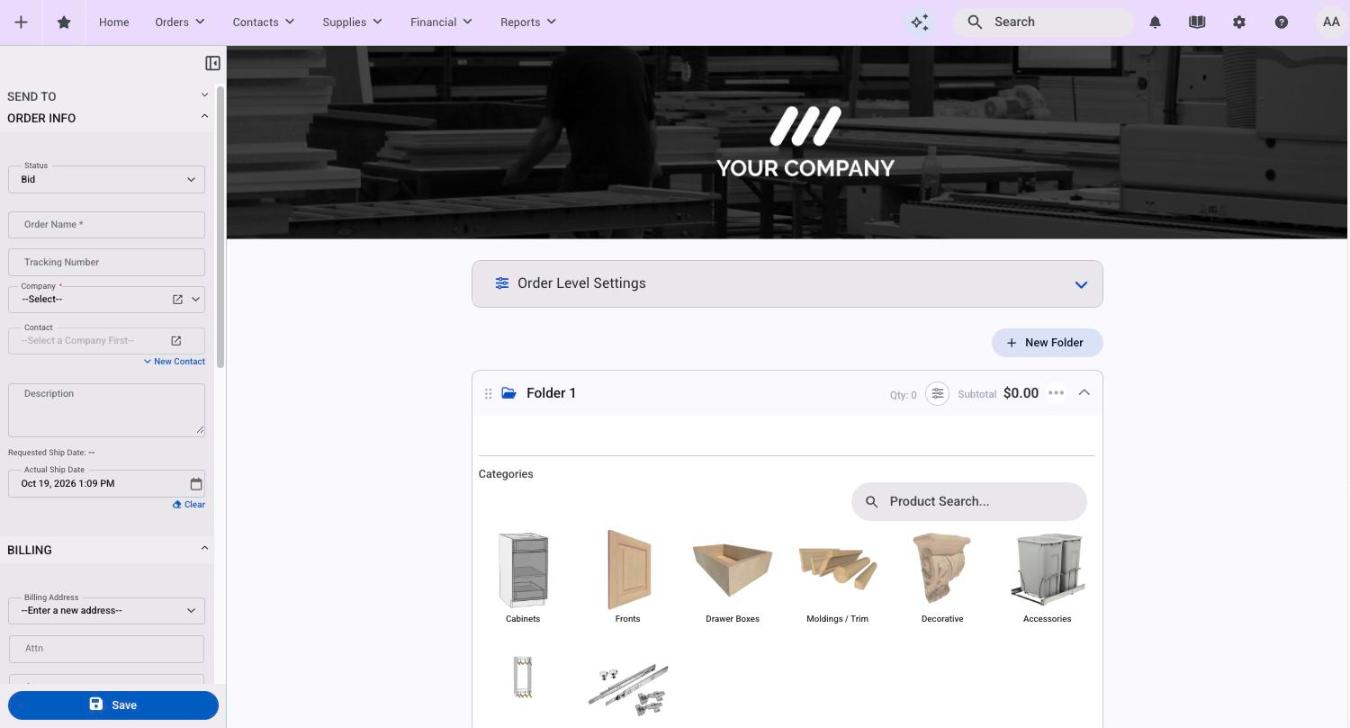
- Order Name (required, up to 50 characters): what you'll recognize the job by.
- Company (required): search for the customer, or choose Retail Order.
- Contact: pick one of the company's contacts, or type a new first and last name.
- Description and any custom fields your shop uses.
- Requested Ship Date: when the customer would like it.
- Actual Ship Date: when you expect to ship it. It starts at today plus your Default Lead Time; see Set ship dates, lead times and the production schedule.
- Fill in the billing and shipping addresses. The shipping block also has Same as Billing, Attn, Shipping Instructions and Shipping Method.
Add products
Pick products from your catalog, answer their options, and add them to the order. Each line shows its price as you build it. A line that shows "-" instead of a price has an answer that can't be priced; fix it before you submit, because a line like that keeps the whole order a Bid.
Group products into folders
Folders split one order into groups while keeping a single order name and total. Quoting a whole kitchen? Make a folder for the Kitchen, one for the Island and one for the Pantry, and the order and its output pages break out the same way.
- Every order starts with one folder. Click New Folder to add another.
- Use the folder's actions to Rename, Duplicate or Remove it.
- Collapse a folder to tuck it out of the way, and Expand it to open it again.
Each folder shows its quantity and subtotal in its header.
To print folder names on a quote or invoice, open the output page's settings and tick Show folder name. There's also a Folder Name variable if you want to place it yourself. See Guide: Output pages.
Attach files
Drawings, photos and sign-offs belong with the order, where everyone working the job can find them.
Each file has a visibility that decides who can see it:
| Visibility | Who it's for |
|---|---|
| Private | The most restricted choice, for files only certain people at your shop should see. |
| My Company | People at your company. |
| Anyone | Everyone with access to the order, including your customer. |
- Open Attachments in the order's sidebar.
- Choose the visibility.
- Add the file, then save the order.
New files start as My Company, so your customer can't see a file until you set it to Anyone.
Give the order a discount
To take a percent off one order, enter it in Discount percent in the order's totals, below the products, then save. Only employees allowed to set discounts can change it.
To give certain customers, or all your dealers, the same discount on every order, use a price adjustment instead. See Price adjustments.
On a placed order, a new discount percent reprices every line from today's catalog, and once the order ships the discount is locked (see Things to know).
Save or submit
- Save keeps the order as a Bid: a quote you or the customer can come back to and change. Prices on a bid keep following your catalog until it's placed.
- Submit Order places it. The status moves to Ordered (or straight to Verified if your shop auto-verifies orders; see Change an order's status).
If you turn on Always show terms and conditions when submitting order at Settings > E-commerce > Order Settings, your customer sees your Terms and Conditions when they submit.
Submit Order saves the order but leaves it a Bid when something has to happen first: a line has a broken price, the customer has to pay first or pay a deposit, the customer is over their order limit, no payment gateway is set up, or a B2B supplier isn't ready. The message after saving says which. See My customer can't pay or can't place an order.
Check that it worked
The status in Order Info reads Ordered (or Verified with auto-verify on), and the order shows in the list at Orders > Orders.
Things to know
- Customers get a head start. When a logged-in customer starts an order, their company and contact are already filled in.
- Customers see their own orders. A customer can open only their own company's orders, and only the ones they entered or are the contact on, unless they're allowed to view any order.
- Changing the order discount reprices every line. On a placed order, a new discount percent recalculates every line from today's catalog, not just the discount.
- The first attachment can notify your team. Adding the first file to an order fires an automation event you can use in a trigger.
- On project orders, folders are Rooms.
Watch: Discount a single order (older screens)