
In Allmoxy, everyone is a contact at a company. Your customers are companies with the Customer role, the people who order for them are company contacts, and a buyer with no business behind them is an individual account. This guide explains those three things, shows where each list lives, and walks through the one page to open when a customer calls. Each section links to the article with the steps.
Applies to: every shop. Seeing companies other than your own needs the View other companies permission, and seeing people outside your own company needs View user not in their company. The pages linked below name the permission each task needs.
In this article
- Companies, contacts and individual accounts
- Where each list lives
- Find a customer's information fast
- What each article in this section covers
- Before you go live
- Things to know
Companies, contacts and individual accounts
Three kinds of record hold everyone you deal with:
- A company is a business: a customer, a vendor, or something else. Your own shop is a company too, and its contacts are your employees. What a company is to you is set by its roles: Customer, Vendor or Other. A company can hold more than one role and must keep at least one. Only a company with the Customer role can order from you.
- A company contact is a person who works at a company. A contact must belong to an existing company. The first contact added to a company becomes its primary contact, which matters for Dealer Mode and some emails.
- An individual account is a customer with no business behind them: a homeowner ordering a few doors, for example. Behind the scenes Allmoxy gives them a one-person company, but they never appear on the Companies list. They have their own list and their own role, Individual.
Two more roles exist but you never pick them: Employer is your own company, and Individual is set automatically for personal accounts.
Where each list lives
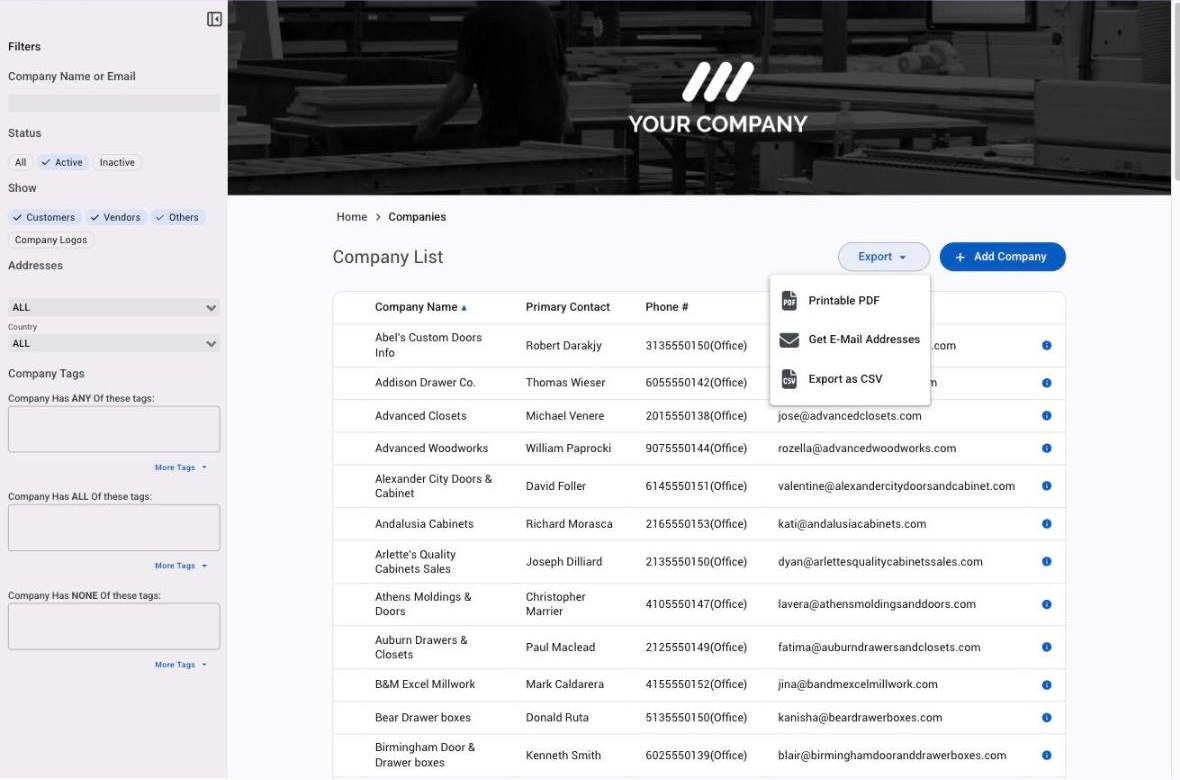
| List | Where | Who is on it |
|---|---|---|
| Companies | Contacts > Companies | Every business: customers, vendors and others. Add a new one from Add > Company. |
| Company Contacts | Contacts > Company Contacts | Every person at a business, your own employees included. Add one from Add > Company Contacts. |
| Individual Accounts | Contacts > Individual Accounts | Personal (one-person) customers. Add one from Add > Individual Accounts. |
The Companies list filters by name or email, Status (Active by default, Inactive, or All), Show (Customers, Vendors, Others), address type, country, state, and company tags (any, all or none of the tags you pick). The filters you set stay in place for the rest of your session, so if a company seems to be missing, check the Status filter first: inactive companies are hidden by default. Others also shows your own company and any company with no role.
Find a customer's information fast
When a customer calls, open their company and you have everything in one place. Search for the company by name in the search box at the top of any page, or find it on Contacts > Companies. The company page shows:
- The balance strip across the top: Outstanding Balance, Amount Due Shipped and Past Due, with Payment Term, Credit Available, Credit Limit and Credit Limit Remaining underneath. This answers "what do I owe you?" and "can I place another order?" without opening a report.
- About: the company's details, tags, addresses and phone numbers.
- Outstanding Invoices: every unpaid invoice.
- Orders: their order history, with status.
- Contacts: everyone at the company, who can sign in, and who the primary contact is.
- Subscriptions and Notes: anything your team has written about them, and any recurring billing.
- My Tasks in the sidebar: tasks about this company assigned to you.
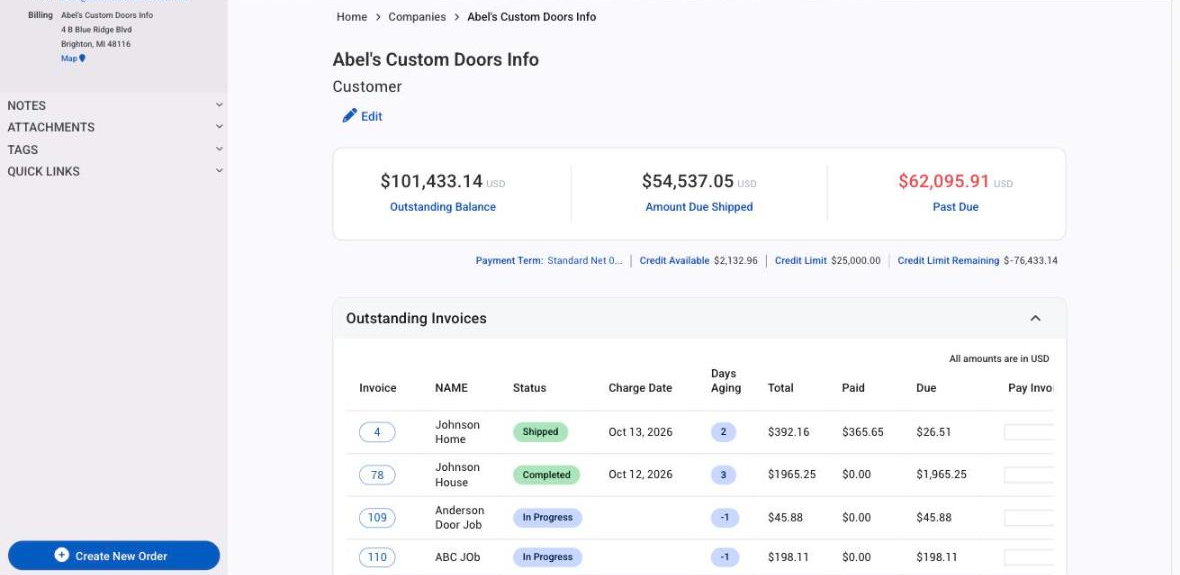
Click a contact's name to see that person, their username and their own permissions. For the financial fields, see Financial settings on a company and Credit limits and order limits.
What each article in this section covers
- Add customers. Let them sign up with your Create Account link, add a company and its people by hand, or import a list. See Add customers: sign-up, add by hand, or import a list.
- Review new sign-ups. Get told about every sign-up, tag it so the right prices apply, decide whether to hold its first order, and clear out fake accounts. See Review new sign-ups and keep fake accounts out.
- What customers see. Where they land, which reports they have, and how customer permissions work. See What your customers see and can do.
- Edit, deactivate, merge or delete. Change a company or contact, fix many contacts at once, deactivate someone, merge duplicates, or delete a record with no history. See Edit, deactivate, merge or delete customers.
- "The email is already taken". The fix when the address is already on another record. See "The email is already taken" when adding a contact.
- Export and email. Get your lists out as a PDF, email addresses or a CSV, and reach every customer at once. See Export your customer list and email your customers.
- Notes, tasks and announcements. Keep what you know about a customer on their record, assign follow-ups, and post messages to groups. See Use notes, tasks and announcements.
- Tags and pricing by customer group. Tags group customers so you can price, show products and fire triggers by group. See Tags: group customers, orders and products, Prices and products for each customer group and Dealer Mode.
Before you go live
A short checklist before you open Allmoxy to your customers:
- Connect Stripe. Customers can't submit orders until you can take payment; see Set up Stripe to take payments online.
- Write your terms and conditions on Settings > E-commerce > Order Settings; see Where can my customer see my terms and conditions?.
- Set payment terms, credit limits and order limits for your shop defaults and for any customer that differs; see Payment terms overview and Credit limits and order limits.
- Decide how customers get in (sign up, added by hand, or imported) and turn on the triggers that welcome them and tell your team about every new sign-up; see Add customers and Review new sign-ups.
- Check your output pages and export files so confirmations, invoices and cut lists come out the way the shop needs them; see Guide: Output pages and Exporters.
- Run one real order end to end. Place it as a customer would, check the emails, verify it, start production, print the cut lists and export files, ship it, invoice it, take a small real payment and watch the payout reach your bank; see Guide: Orders in Allmoxy and Guide: Financials in Allmoxy.
- Launch in phases. Your own team first, then a few open-minded customers who will give feedback, then everyone. Send customers Create your account, watch the new sign-ups, and answer questions fast in the first week.
Things to know
- A company with no roles isn't a customer. If someone creates a company without the Change company roles permission, it is saved with no roles and its people start with no permissions. Open the company, click Edit and tick Customer.
- Inactive records are hidden, not gone. The Companies and Company Contacts lists show active records by default. Switch the Status filter to see the rest.
- Individuals aren't on the Companies list. If you can't find a personal customer, look on Contacts > Individual Accounts.